
Wednesday, October 20, 2010
Another Linky - This one for pumpkins
In addition to my Top Ten {Plus} list that I've been keeping, there are some fantastic, creative ideas out there on these link parties I've been posting. You should definitely check them out!!
Friday, October 15, 2010


Halloween Decor - My Own Hizzie
After weeks of looking at all the great Halloween decorating ideas from some of my favorite blogs and some blogs that I discovered in the process, I finally took some pictures of what I did around our house. As I stated in my Top Ten Plus post here, I pulled ideas from a lot of those sources and then added my own twist. Enjoy!!
Outside:


Details:
Door: The pumpkin and the happy halloween sign are from Dollar Tree and I combined them into one with a safety pin.
Tombstones: had the big ones and added 3 small ones (& the skull) this year from DT.
Web: Walmart end of season purchase from a few years ago.
Pumpkin Landscape Lights: came with husband.
Front porch: Little pumpkin ceramic 'bag' lights from Gardenridge before they closed down and old school pumpkins came with husband.
Door Mat from Lowes.
Living Room Mantle and Console Table:


Details:
Moss, spiders and small skulls & larger white glitter skull from DT
Larger pumpkins from Ben Franklins, smaller pumpkins I had from some potpourri. I painted the skulls and pumpkins with white spray paint then went over lightly with silver glitter glue.
Made the bunting banner with one piece of Scrap booking Halloween paper, stickers from DT and letters using a font called 'Bones'.
Starfish and candles I had. I did the bleeding candle thing with a red candle (an old Martha trick I saw on YHL last year).


Details:
Prints from The Graphics Fairy in DT frames, the couple is my husband & I all ghouled out using Pixlr (similar to Photoshop but free!).
Branches cut from dead stuff found in alley and spray painted black; ravens from DT; the picture doesn't show it, but this black vase (again, which came with said husband) has this cool, creepy bend to it. [Darn my picture taking skills!]
Books with creepy titles or visuals from book shelves and little metal votives from IKEA years ago.
Did the bleeding candles thing again. We were really having fun with that!
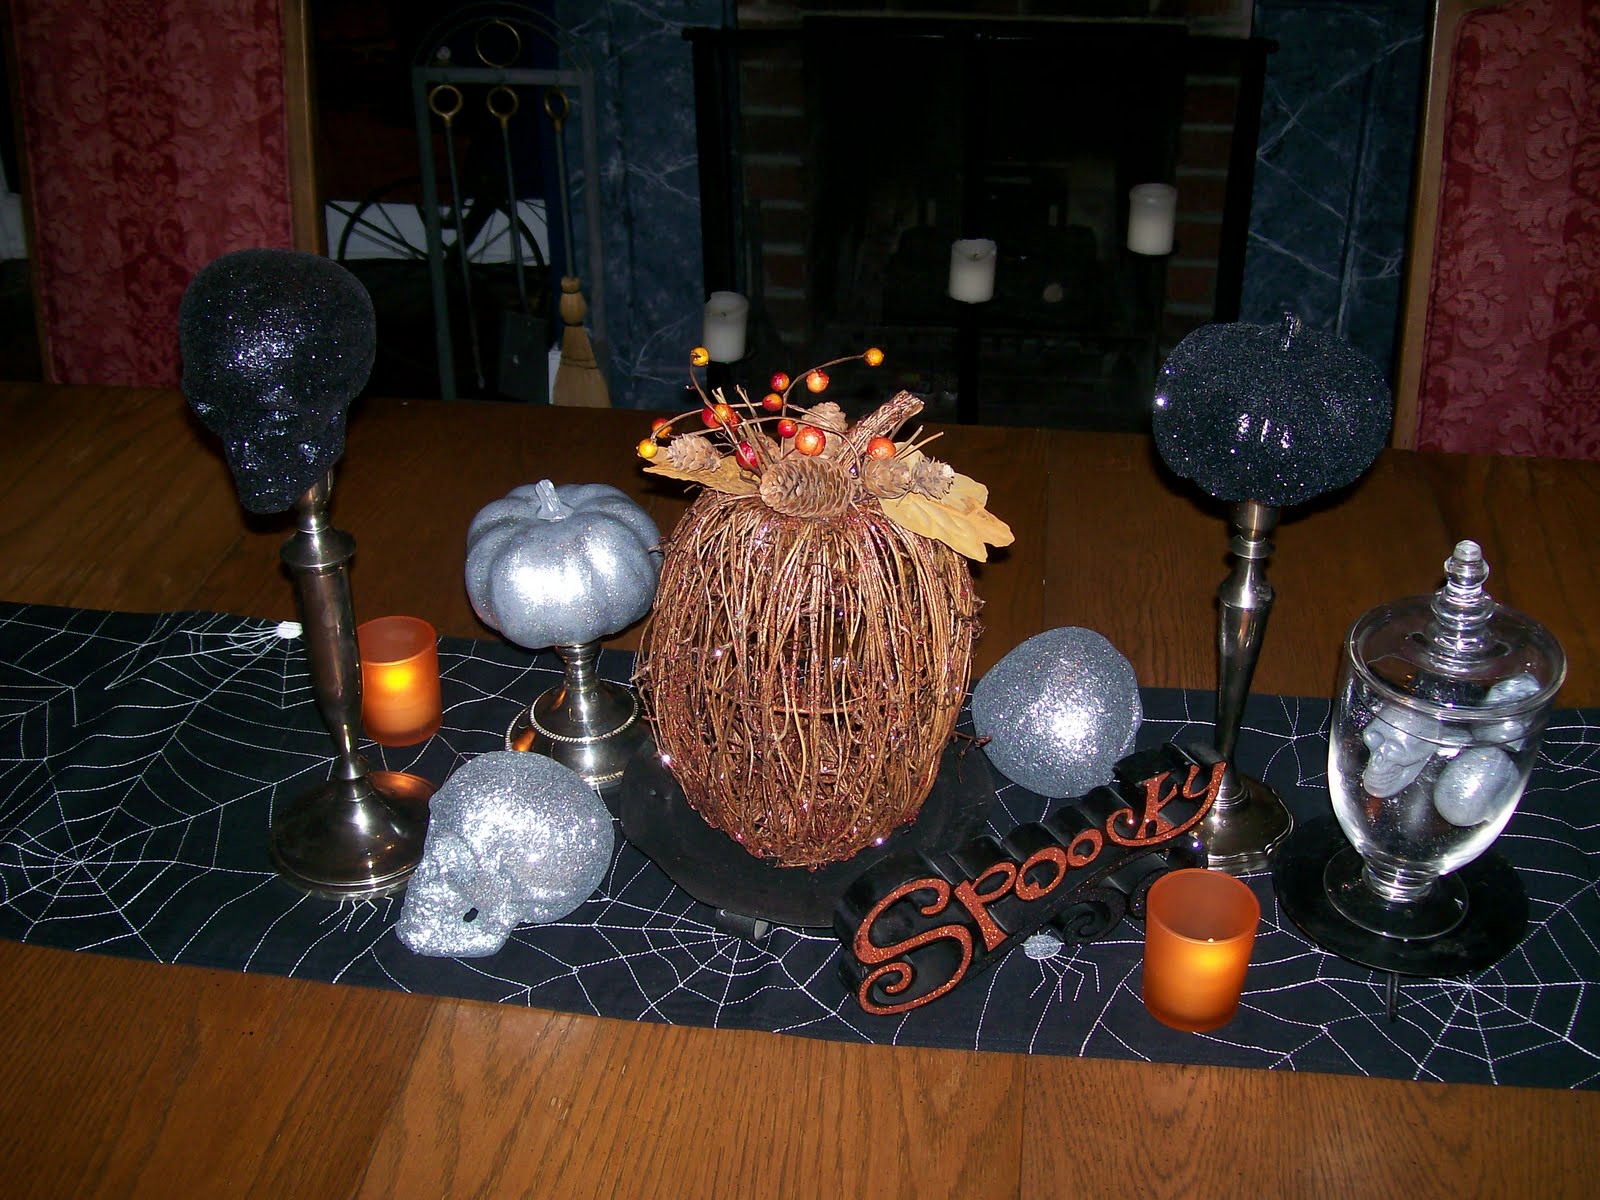
Dining Room Table and Bar:


Details:
Table Runner: Marshalls
Large orange pumpkin: Hobby Lobby
Silver & Black larger skulls and small silver & black skulls in apothecary jar from DT
Spooky sign from Ben Franklins
Black & Sliver pumpkins from Ben Franklins. These I spray painted: one gray and one black then put multiple thick layers of silver glitter paint on the gray one and applied spray adhesive and poured black glitter on the black one. I also did this to all the small skulls.
I already owned the votives and the candle sticks which I left tarnished.
Lastly, I have mucho wine on hand so I grabbed my cheaper bottles and used the printable labels from Centsational Girl (THANKS! My husband loved that idea!) with some spray adhesive. Add a little candle light from behind. The ghoulish stacked skulls came from my husband (I told you he loves Halloween!)
Outside:


Details:
Door: The pumpkin and the happy halloween sign are from Dollar Tree and I combined them into one with a safety pin.
Tombstones: had the big ones and added 3 small ones (& the skull) this year from DT.
Web: Walmart end of season purchase from a few years ago.
Pumpkin Landscape Lights: came with husband.
Front porch: Little pumpkin ceramic 'bag' lights from Gardenridge before they closed down and old school pumpkins came with husband.
Door Mat from Lowes.
Living Room Mantle and Console Table:


Details:
Moss, spiders and small skulls & larger white glitter skull from DT
Larger pumpkins from Ben Franklins, smaller pumpkins I had from some potpourri. I painted the skulls and pumpkins with white spray paint then went over lightly with silver glitter glue.
Made the bunting banner with one piece of Scrap booking Halloween paper, stickers from DT and letters using a font called 'Bones'.
Starfish and candles I had. I did the bleeding candle thing with a red candle (an old Martha trick I saw on YHL last year).


Details:
Prints from The Graphics Fairy in DT frames, the couple is my husband & I all ghouled out using Pixlr (similar to Photoshop but free!).
Branches cut from dead stuff found in alley and spray painted black; ravens from DT; the picture doesn't show it, but this black vase (again, which came with said husband) has this cool, creepy bend to it. [Darn my picture taking skills!]
Books with creepy titles or visuals from book shelves and little metal votives from IKEA years ago.
Did the bleeding candles thing again. We were really having fun with that!
Dining Room Table and Bar:


Details:
Table Runner: Marshalls
Large orange pumpkin: Hobby Lobby
Silver & Black larger skulls and small silver & black skulls in apothecary jar from DT
Spooky sign from Ben Franklins
Black & Sliver pumpkins from Ben Franklins. These I spray painted: one gray and one black then put multiple thick layers of silver glitter paint on the gray one and applied spray adhesive and poured black glitter on the black one. I also did this to all the small skulls.
I already owned the votives and the candle sticks which I left tarnished.
Lastly, I have mucho wine on hand so I grabbed my cheaper bottles and used the printable labels from Centsational Girl (THANKS! My husband loved that idea!) with some spray adhesive. Add a little candle light from behind. The ghoulish stacked skulls came from my husband (I told you he loves Halloween!)
Wednesday, October 13, 2010
First Link Party...
It's a paint party and I put my cat food tin out there....
Feel free to follow me! I'd love to double my followers by my 1 year blogiversary!

Feel free to follow me! I'd love to double my followers by my 1 year blogiversary!
Wednesday, October 6, 2010
Quick Link Love - Cast your Votes!
A couple of blog friends are in contests. If you land on my meager page and by some crazy chance haven't seen theirs, take the time to vote:
For Sara at Russet Street Reno: her awesome art room makeover
Place to vote, One Project Closer, here.
Nine posts with amazing pictures on her site about the art room makeover here.
For Kelly at Tearing Up Houses: her beautiful bedroom makeover
Place to vote: Who doesn't love Apartment Therapy!
Original Post on her site about the bedroom (one of two), here.
Good Luck Ladies!!
Tuesday, October 5, 2010
Cat Food Tin Makeover
For years, I've used this same ugly-but-free tin to hold my cats' food. It was always slightly annoying, but lately it has been almost unbearable. Perhaps as I discovered the enormous world of blogging and find myself constantly stalking the most craft-, DIY- and decor-savvy people, some of it has rubbed off on me. So here's my little mini-makeover inspired by so many fabulous people with a penchant for spray paint and making ugly things pretty (or in this case, more bearable and less noticeable).


So, I searched the garage and found ample amounts of white & black spray paint and proceeded to put on about 4 coats of white spray paint on the can and a couple of coats of black on the lid.


I picked up some cool letter stencils at Hobby Lobby when I was home visiting my mom (can't believe my small home town has one of these and my large current city does not!) and picked up some black acrylic paint at our local Ben Franklins and already had a little kit of paint brushes from long ago - probably a Dollar Tree purchase.


I used a pencil to very lightly trace the letters onto the can from the stencil (which doesn't show very well in the picture below) and then used a couple of small paint brushes to fill in the stencils with the black paint.


At the end of the project, I have a much more incognito cat food tin that blends a lot better with my white kitchen AND the big arse white trash can that came with my husband when he moved in and insisted on keeping....


Subscribe to:
Posts (Atom)